Instructions
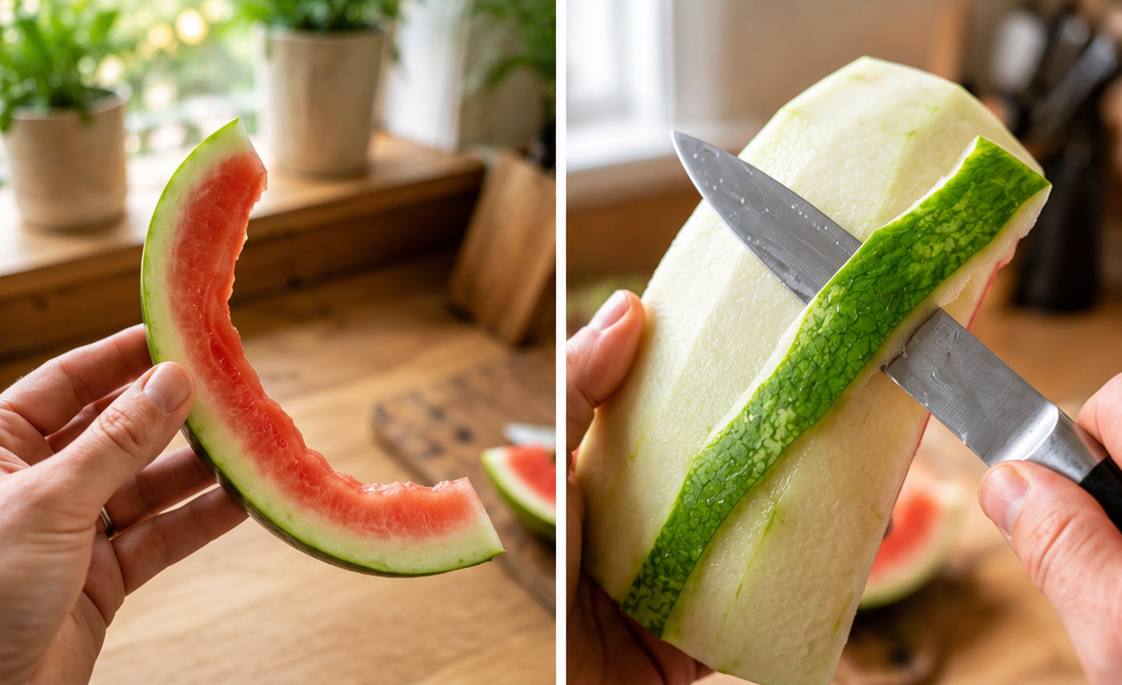
- Prepare the Watermelon Rinds: Carefully slice the watermelon into large sections. Using a sharp chef’s knife or a sturdy spoon, scrape away all the pink flesh from the rind, leaving only the white and pale green parts. Next, use a vegetable peeler or a sharp knife to carefully remove the tough, dark green outer skin from the rinds. This step is crucial for a tender pickle.
- Cut the Rinds: Once the pink flesh and green skin are removed, cut the white rind into uniform pieces. Cubes (about 1-inch), strips, or wedges work well. Uniform pieces ensure even cooking.
- Pre-treat (Optional but Recommended) – Salting the Rinds: Place the cut watermelon rind pieces in a large bowl. Sprinkle with 2 tablespoons of kosher salt and toss to coat evenly. Cover the bowl and let it sit at room temperature for at least 2 hours, or preferably overnight in the refrigerator. This step draws out excess water, which helps to firm up the rind and ensures a crisper pickle.
- Rinse the Rinds: After salting, thoroughly rinse the watermelon rind pieces under cold running water. This removes the excess salt. Drain well and gently squeeze out any remaining water.
- Sterilize Jars: While the rinds are salting or rinsing, sterilize your canning jars and lids. You can do this by washing them in hot, soapy water and then boiling the jars for 10 minutes, or running them through a hot cycle in your dishwasher. Keep them hot until ready to fill.
- Make the Brine: In a large, non-reactive pot or saucepan, combine the white vinegar, granulated sugar, water, mustard seeds, whole cloves, cinnamon stick pieces, whole black peppercorns, bay leaves, red pepper flakes (if using), and sliced ginger (if using).
- Boil the Brine: Bring the brine mixture to a rolling boil over medium-high heat, stirring occasionally to dissolve the sugar. Once boiling, reduce the heat to a simmer and let it cook for 5-7 minutes to allow the flavors to meld.
- Cook the Rinds in Brine: Add the rinsed and drained watermelon rind pieces to the simmering brine. Increase the heat slightly to bring the mixture back to a gentle simmer. Cook the rinds for 15-25 minutes, or until they become translucent and tender-crisp. The cooking time will vary depending on the thickness of your rind pieces and your desired texture. You want them to be tender but still have a slight bite.
- Pack the Jars: Carefully remove the hot, sterilized jars from the hot water. Using a slotted spoon, divide the cooked watermelon rind pieces evenly among the hot jars, packing them fairly tightly but leaving about 1/2 inch of headspace from the rim.
- Fill with Brine: Ladle the hot brine over the rinds in each jar, ensuring the rinds are completely submerged. Maintain the 1/2 inch headspace. You may need to use a funnel for easier pouring.
- Remove Air Bubbles: Use a non-metallic utensil (like a chopstick or plastic knife) to gently dislodge any air bubbles trapped in the jars. Add more brine if necessary to maintain headspace.
- Seal the Jars: Wipe the rims of the jars clean with a damp cloth. Place the lids on top and screw on the bands until finger-tight.
- Process (for Shelf-Stability) or Refrigerate:
- For Shelf-Stable Pickles (Canning Method): Place the filled jars into a boiling water canner, ensuring they are covered by at least 1 inch of water. Bring the water to a rolling boil and process pint jars for 10 minutes (or quart jars for 15 minutes). Once processed, turn off the heat, remove the canner lid, and let the jars sit in the hot water for 5 minutes before carefully removing them to a wire rack to cool completely for 12-24 hours. Check seals; any unsealed jars should be refrigerated.
- For Refrigerator Pickles: Allow the jars to cool to room temperature on your countertop. Once cool, transfer them to the refrigerator. These pickles will be ready to eat in 24-48 hours but will develop deeper flavor over a week.
Cooking Tips and Variations
To achieve the best watermelon rind pickles, start with a firm, ripe watermelon. The rinds from larger watermelons tend to be thicker, yielding more substantial pickle pieces. When peeling the green skin, a sturdy vegetable peeler can be more efficient and safer than a knife, especially if you’re new to this. Don’t skip the pre-salting step; it’s the secret to a wonderfully crisp pickle texture, preventing them from becoming mushy. Ensure you rinse thoroughly to avoid overly salty pickles.
The beauty of this recipe lies in its adaptability. For a more pronounced sweet-and-sour balance, you can adjust the sugar and vinegar ratios to your liking. If you prefer a less sweet pickle, reduce the sugar by half a cup. For extra tang, add another splash of vinegar. Experiment with different spice combinations: a star anise or a few cardamom pods can add an exotic twist, while a sprig of fresh dill or a few garlic cloves can lean it towards a more savory profile. Citrus zest, like lemon or orange, can brighten the flavor considerably. For those who enjoy heat, increase the red pepper flakes or add a small fresh chili pepper to the brine. Remember, the longer the pickles sit, the more the flavors will meld and deepen, so patience is key for optimal taste.
Storage and Reheating
For refrigerator pickles, once cooled, store the sealed jars in the refrigerator. They will last for up to 3-4 weeks. The flavor will continue to develop over the first few days. There is no reheating necessary for pickles; they are best served chilled or at room temperature. For shelf-stable, water-bath canned pickles, store the sealed jars in a cool, dark place, such as a pantry. They can last for up to 1 year. Once a jar is opened, it must be refrigerated and consumed within 2-3 weeks. Always ensure the lid is tightly sealed after each use to maintain freshness and prevent spoilage.
Frequently Asked Questions
Can I use any type of watermelon for this recipe?
Yes, you can use any variety of watermelon, but those with thicker rinds, like traditional seeded watermelons, will yield more usable material and often a better texture for pickling. Seedless watermelons often have thinner rinds, which can still work but might result in smaller, less substantial pickle pieces.
Do I have to peel off all the green skin?
Yes, it’s highly recommended to peel off all the tough, dark green outer skin. This part of the rind is very fibrous and can be unpleasantly chewy in the finished pickle. Removing it ensures a tender-crisp texture that is much more enjoyable.
How long do these pickles need to sit before eating?
While you can technically eat them after 24 hours, watermelon rind pickles truly shine after sitting for at least 3-5 days in the refrigerator. This allows the flavors of the brine and spices to fully penetrate the rinds, resulting in a more complex and delicious pickle. For shelf-stable canned pickles, allow them at least 2 weeks before opening for optimal flavor development.
What can I do with leftover watermelon flesh?
Don’t let the delicious pink flesh go to waste! You can use it to make refreshing smoothies, fruit salads, sorbets, or even a simple watermelon juice. Some people even grill watermelon for a unique side dish, or use it in savory salads with feta and mint. The possibilities are endless!