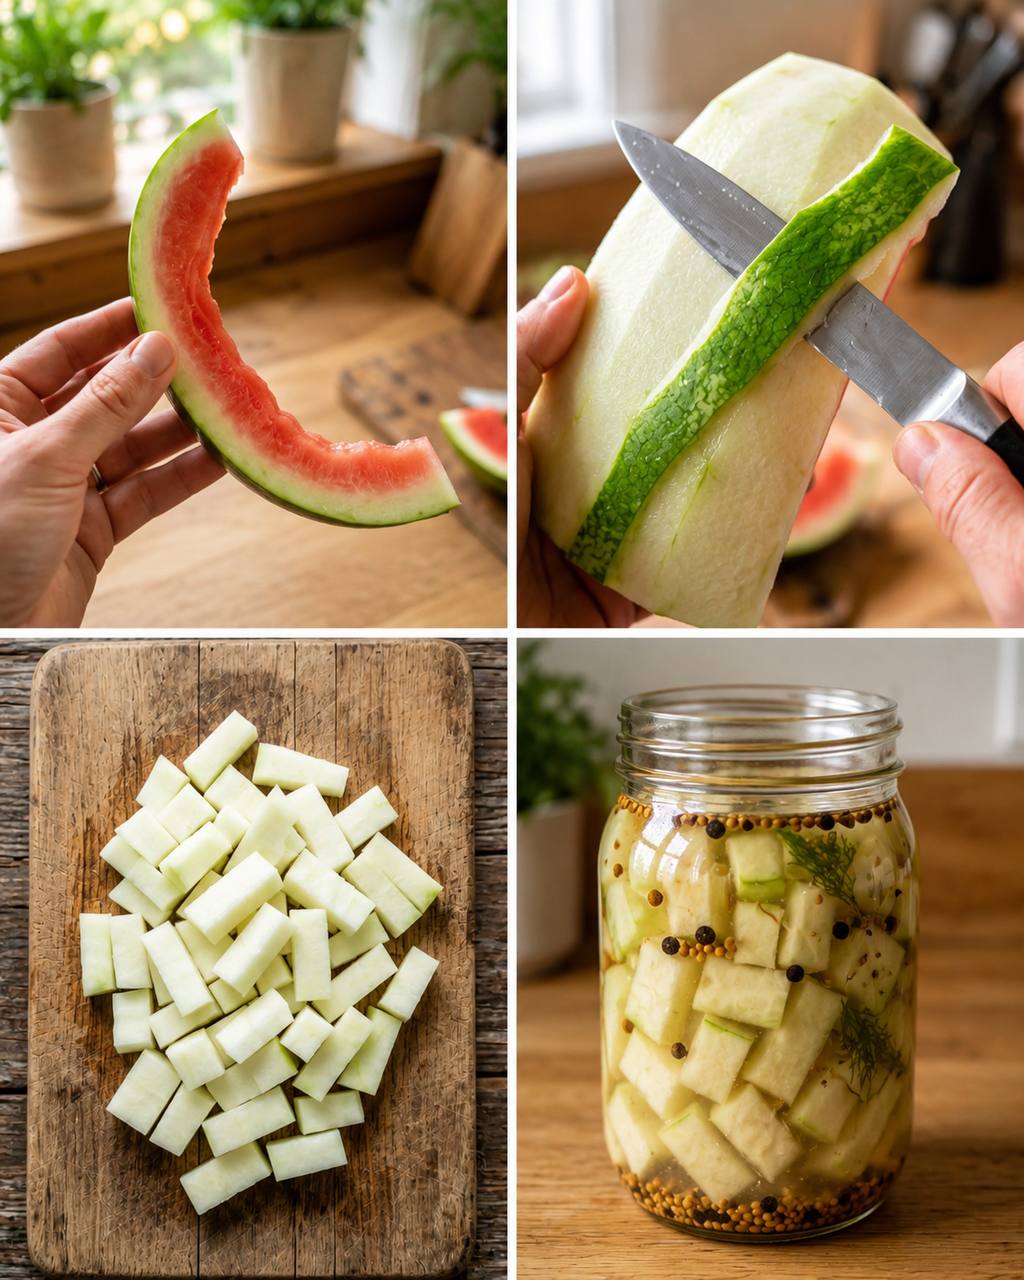
Instructions
- Prepare the Watermelon Rind:
- Carefully cut the watermelon into large sections. Using a sharp knife, trim away all of the pink flesh from the rind, leaving only the white and light green parts. You want to remove as much of the red as possible.
- Next, use a vegetable peeler or a sharp paring knife to carefully remove the dark green outer skin from the rind. You should be left with only the pale white and light green portion of the rind. Discard the green skin and red flesh.
- Cut the prepared white rind into uniform pieces, about 1-inch cubes or 1/2-inch thick spears. Uniform pieces ensure even pickling.
- Optional Soaking for Extra Crispness (Recommended):
- Place the cut watermelon rind pieces into a large bowl. Cover them with cold water and add 2 tablespoons of pickling salt. Stir to dissolve the salt.
- Place a plate or a smaller bowl on top of the rind to keep it submerged. Let it soak for 4-6 hours, or preferably overnight, in the refrigerator. This step helps draw out excess moisture, ensuring a crispier pickle.
- After soaking, drain the rind thoroughly and rinse it under cold running water to remove excess salt. Drain again and pat dry with paper towels.
- Sterilize Jars:
- Wash your canning jars and lids thoroughly with hot, soapy water.
- To sterilize, you can either run them through a dishwasher on a hot cycle, or place the jars (without lids) in a large pot, cover with water, bring to a boil, and boil for 10 minutes. Keep the jars hot until ready to fill.
- Place the lids and bands in a small saucepan with hot (not boiling) water to soften the sealing compound.
- Prepare the Brine:
- In a non-reactive saucepan (stainless steel or enamel), combine the white vinegar, water, granulated sugar, pickling salt, mustard seeds, black peppercorns, whole cloves, and ground turmeric (if using).
- Bring the mixture to a boil over medium-high heat, stirring occasionally to dissolve the sugar and salt.
- Once boiling, reduce the heat to a simmer and let it cook for 5 minutes to allow the flavors to meld.
- Pack the Jars:
- Carefully remove the hot, sterilized jars from the water (or dishwasher).
- Divide the prepared watermelon rind pieces among the hot jars, packing them snugly but not too tightly.
- Add a sprig of fresh dill and 2-3 slices of garlic (if using) to each jar.
- Carefully pour the hot brine over the watermelon rind, ensuring the rind is completely submerged. Leave about 1/2 inch of headspace from the rim of the jar.
- Tap the jars gently on the counter to release any trapped air bubbles. If needed, add more brine to maintain the 1/2-inch headspace.
- Seal the Jars:
- Wipe the rims of the jars clean with a damp cloth to remove any brine or food particles.
- Place the hot lids on the jars and screw on the bands until fingertip tight (do not overtighten).
- Cool and Store:
- Allow the jars to cool completely at room temperature. As they cool, the lids should seal, creating a vacuum (you’ll hear a “pop” sound as they seal, and the center of the lid will be depressed).
- Once cooled and sealed, store the watermelon rind pickles in the refrigerator.
- For the best flavor development, wait at least 1-2 weeks before opening and enjoying your pickles. This allows the rind to fully absorb the brine flavors.
Cooking Tips and Variations
Rind Selection: For the best watermelon rind pickles, choose watermelons with thick rinds. Varieties like ‘Crimson Sweet’ or ‘Jubilee’ often have substantial white rinds, providing more material for pickling. Avoid watermelons with very thin rinds, as they yield less usable material.
Achieving Maximum Crispness: The optional overnight salt soak is highly recommended for achieving truly crisp pickles. This process draws out excess water from the rind, preventing it from becoming soft and mushy during pickling. Don’t skip it if you crave that satisfying crunch!
Uniform Cutting: Cut your watermelon rind pieces into uniform sizes and shapes. This ensures that all pieces pickle evenly and have a consistent texture, making for a more enjoyable eating experience.
Flavor Customization:
- Spicier Pickles: Add 1/2 teaspoon of red pepper flakes or a few dried chilis to the brine for a kick.
- Aromatic Variations: Experiment with other pickling spices. Consider adding a bay leaf, a few star anise pods, a cinnamon stick, or a few slices of fresh ginger to the brine for different aromatic profiles.
- Sweeter Pickles: If you prefer a sweeter pickle, you can increase the sugar by 1/4 to 1/2 cup. Taste the brine before pouring to adjust to your preference.
- Herb Alternatives: While dill is classic, you can try other fresh herbs like tarragon or a small sprig of rosemary for a different flavor.
Brine Quantity: The amount of brine needed can vary slightly depending on how tightly you pack your jars and the exact volume of rind you have. It’s always better to make a little extra brine than to run short. You can easily scale the brine recipe up or down as needed.
Jar Sterilization is Key: While these are refrigerator pickles and not intended for long-term shelf-stable canning, sterilizing your jars is still crucial. It helps prevent spoilage and ensures a clean, safe environment for your pickles, extending their refrigerator shelf life.
Don’t Overfill Jars: Leave the recommended 1/2-inch headspace in the jars. This allows for proper sealing and prevents the brine from overflowing during cooling.
Patience is a Virtue: Resist the urge to try your pickles immediately! While they’ll be edible, the flavors truly develop and deepen after at least 1-2 weeks in the refrigerator. The longer they sit, the more infused and delicious they become.
Troubleshooting Soft Pickles: If your pickles turn out soft, it’s usually due to not soaking the rind in salt water long enough, not rinsing it thoroughly, or cutting the pieces too small. Ensure your rind is firm before pickling.
Storage and Reheating
Storage: Watermelon rind pickles are refrigerator pickles, meaning they are not processed for shelf-stable storage at room temperature. Once the jars have cooled and sealed (or if a jar doesn’t seal, it’s still safe to eat), they must be stored in the refrigerator. Properly stored in airtight, sealed jars, these pickles will maintain their quality and crispness for up to 2-3 months in the refrigerator. Over time, their crispness may slightly diminish, but they will remain delicious. Always ensure the rind pieces are submerged in the brine; if any pieces are exposed to air, they can spoil faster.
Reheating: Watermelon rind pickles are not meant to be reheated. They are a cold condiment, intended to be served chilled or at room temperature. Reheating them would compromise their crisp texture and fresh, tangy flavor profile, turning them soft and unappetizing. Simply remove them from the refrigerator and serve directly from the jar.
Frequently Asked Questions
What kind of watermelon rind is best for pickling?
The best watermelon rinds for pickling come from varieties with thick, firm rinds, such as ‘Crimson Sweet’ or ‘Jubilee’. These types offer a substantial amount of white flesh, which is ideal for pickling and yields a crispier end product. Avoid watermelons with very thin rinds, as they provide less usable material and can be more challenging to prepare.
Can I use a different type of vinegar for the brine?
While white vinegar is traditionally used for its clean, sharp acidity that allows the other flavors to shine, you can experiment with other vinegars. Apple cider vinegar can add a slightly fruitier, mellower tang, but ensure it’s at least 5% acidity for proper pickling. Avoid balsamic or red wine vinegar, as their strong flavors and colors can overpower the delicate taste of the watermelon rind and result in a less appealing appearance.
Why did my watermelon rind pickles turn out soft?
Soft pickles are a common issue. The most frequent reasons include not performing the optional salt-water soak, which is crucial for drawing out excess moisture and firming up the rind. Other factors could be cutting the rind pieces too small, leading to them breaking down easily, or overcooking the brine with the rind in it (though in this recipe, the rind is added to the jars before the hot brine). Ensure you follow the salt-soaking step and handle the rind gently.
How long do I need to wait before eating the pickles?
While technically edible after the jars have cooled, the flavors of watermelon rind pickles truly develop and deepen with time. We recommend waiting at least 1-2 weeks in the refrigerator before enjoying them. This allows the rind to fully absorb the complex flavors of the brine, resulting in a much more delicious and well-rounded pickle. The longer they sit, up to their optimal shelf life, the more infused and flavorful they become.