Instructions
- Prepare the Strawberry Puree (if making strawberry flavor): If using fresh strawberries, hull them and slice. If using frozen, let them thaw slightly. Combine the strawberries and optional granulated sugar in a small saucepan over medium heat. Cook, stirring occasionally, until the strawberries soften and release their juices, about 5-7 minutes. Remove from heat and let cool slightly. Transfer the mixture to a blender or food processor and blend until smooth. If desired, pass the puree through a fine-mesh sieve to remove seeds for an extra smooth texture. Let cool completely in the refrigerator.
- Chill Your Equipment: For best results, place your mixing bowl (preferably metal) and whisk attachments (for an electric hand mixer) or stand mixer bowl and whisk attachment in the freezer for 10-15 minutes before starting. This helps the heavy cream whip up faster and achieve stiffer peaks.
- Whip the Heavy Cream: Pour the very cold heavy cream into your chilled mixing bowl. Using an electric mixer on medium-high speed, whip the cream until it forms stiff peaks. This means when you lift the whisk, the peaks hold their shape firmly without drooping. Be careful not to overmix, or it will turn grainy.
- Combine Sweetened Condensed Milk and Vanilla: In a separate large bowl, pour in the cold sweetened condensed milk. Stir in the vanilla extract and a pinch of salt.
- Gently Fold in Whipped Cream (Vanilla Base): Add about one-third of the whipped cream to the sweetened condensed milk mixture. Gently fold it in with a spatula until just combined. This lightens the condensed milk mixture, making it easier to incorporate the rest of the whipped cream without deflating it.
- Continue Folding: Add the remaining whipped cream to the sweetened condensed milk mixture and gently fold until no streaks of white cream remain. Be very gentle to maintain as much air as possible in the mixture.
- Divide and Flavor (if making two flavors): If you’re making two flavors like vanilla and strawberry, divide the prepared ice cream base evenly into two separate bowls.
- Flavor the Vanilla Portion: For the vanilla portion, if you haven’t already, ensure you added the vanilla extract in step 4. If you divided the base before adding vanilla, add 1 teaspoon of vanilla extract to one of the bowls and gently fold to combine.
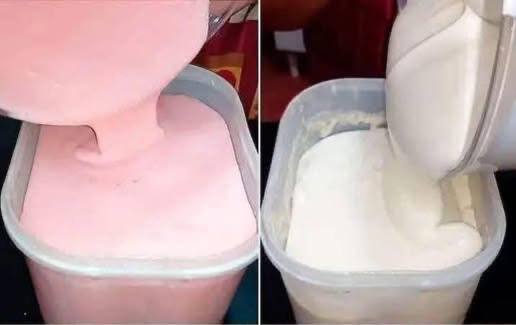
- Flavor the Strawberry Portion: To the second bowl of ice cream base, add the completely cooled strawberry puree and 1/4 teaspoon of vanilla extract. Gently fold until the strawberry puree is evenly distributed and the mixture has a uniform pink color. Be careful not to overmix.
- Prepare for Freezing: Transfer each flavored ice cream mixture into separate freezer-safe containers. You can use loaf pans, plastic containers with airtight lids, or any other suitable freezer-safe vessel. If you want a swirled effect, you can dollop alternating flavors into a single container and gently swirl with a knife, but for distinct layers like in the image, keep them separate.
- Freeze: Cover the containers tightly with plastic wrap or an airtight lid to prevent ice crystals from forming. Place them in the coldest part of your freezer for a minimum of 6 hours, but preferably overnight, or until firm.
- Serve: When ready to serve, remove the ice cream from the freezer and let it sit at room temperature for 5-10 minutes to soften slightly, making it easier to scoop. Enjoy your homemade no-churn ice cream!
Cooking Tips and Variations
To ensure your no-churn ice cream turns out perfectly creamy every time, start with very cold ingredients, especially the heavy cream and sweetened condensed milk. Chilling your mixing bowl and whisk attachments before whipping the cream will significantly help it achieve stiff peaks faster and more effectively. When folding the whipped cream into the sweetened condensed milk, remember to be gentle; the air incorporated into the cream is what gives no-churn ice cream its light, scoopable texture, so you want to preserve as much of it as possible. Overmixing at this stage can lead to a denser, icier result. For the best flavor, use high-quality vanilla extract, and if making the strawberry version, opt for ripe, sweet strawberries to maximize their natural deliciousness.
The beauty of no-churn ice cream lies in its endless customization. Beyond classic vanilla and vibrant strawberry, consider these delicious variations:
- Chocolate: Whisk 1/2 cup unsweetened cocoa powder into the sweetened condensed milk mixture before folding in the whipped cream. You can also add chocolate chips or chunks.
- Coffee: Dissolve 2 tablespoons of instant espresso powder or strong instant coffee in 1 tablespoon of hot water, let it cool completely, then mix it into the sweetened condensed milk.
- Mint Chip: Add 1-2 teaspoons of peppermint extract and a few drops of green food coloring (optional) to the sweetened condensed milk mixture, then fold in mini chocolate chips.
- Cookie Dough: Fold in chunks of edible cookie dough (ensure it’s made with heat-treated flour and no raw eggs) after combining the base.
- Oreo: Crush about 10-12 Oreo cookies and gently fold them into the finished base.
- Peanut Butter Swirl: Swirl in melted peanut butter at the very end when transferring to the freezer container.
- Fruit Swirls: Beyond strawberry, experiment with raspberry, blueberry, or mango purees. Cook down the fruit with a little sugar, cool it, and swirl it into the base just before freezing.
- Nutty Crunch: Fold in toasted chopped nuts like pecans, walnuts, or almonds for added texture.
Storage and Reheating
Proper storage is key to maintaining the creamy texture and preventing freezer burn in your homemade no-churn ice cream. Always transfer the ice cream to an airtight, freezer-safe container. This could be a plastic container with a tight-fitting lid, a glass container, or even a loaf pan tightly covered with several layers of plastic wrap and then aluminum foil. The goal is to minimize exposure to air, which is what causes ice crystals and freezer burn. Store the ice cream in the coldest part of your freezer, typically towards the back, where temperatures are most consistent.
No-churn ice cream does not require “reheating” in the traditional sense, but it does benefit from a brief softening period before serving. When you’re ready to enjoy, remove the container from the freezer and let it sit at room temperature for about 5-10 minutes. This allows the ice cream to soften slightly, making it much easier to scoop and giving it that perfect, creamy consistency. If it’s still too hard, give it another few minutes. Avoid microwaving or rapidly thawing, as this can compromise the texture. Properly stored, your homemade no-churn ice cream will remain delicious for up to 2-3 weeks in the freezer.
Frequently Asked Questions
What makes no-churn ice cream different from traditional ice cream?
The primary difference is the absence of an ice cream maker. Traditional ice cream relies on continuous churning during freezing to break up ice crystals and incorporate air, resulting in a smooth texture. No-churn ice cream achieves a similar smooth, creamy result by using whipped heavy cream for aeration and sweetened condensed milk, which has a low freezing point and high sugar content, to prevent large ice crystals from forming, all without any churning.
Why did my no-churn ice cream turn out icy?
The most common reasons for icy no-churn ice cream are not whipping the heavy cream to stiff enough peaks, deflating the whipped cream by overmixing when combining with the condensed milk, or not covering the container tightly enough during freezing. Ensure your heavy cream is very cold and whipped until firm, and fold gently to maintain air. Also, an airtight container is crucial to prevent moisture from evaporating and then re-freezing as ice crystals.
Can I make this recipe dairy-free or sugar-free?
Making this recipe truly dairy-free is challenging as heavy cream and sweetened condensed milk are core ingredients. While some non-dairy whipping creams exist, their performance can vary, and finding a suitable dairy-free sweetened condensed milk substitute that provides the same texture and sweetness can be difficult. For sugar-free, it’s also very difficult because the sugar in the condensed milk plays a vital role in preventing ice crystals. Substituting with artificial sweeteners often results in a much harder, icier texture. This recipe is best enjoyed in its dairy and sugar-containing form for optimal results.